How to Make Protective Corners to Ship Framed Art

"Goose egg should bear on the surface" is our first advice for packing paintings. Nosotros recognize that in that location are a variety of robust crating and packing methods and materials for shipping paintings, but cost and accessibility tin sometimes make those options out of reach for artists. In the post-obit nosotros desire to share a uncomplicated and cost effective mode of packaging paintings for shipping, using corner and edge protection made from corrugated paper-thin, and then that goose egg is touching the painting's surface. Appropriate packaging for the shipment of paintings is important, and then that typical impairment such as abrasion of paint layers, squashed corners, or deformations in the canvas tin can be avoided. Acrylics are thermoplastics, meaning they become stiffer in colder temperatures and softer and more malleable in warmer ones. Packaging textile can so hands stick to acrylic paintings or crusade ferrotyping, a type of impairment whereby the packaging material would banner its construction into the acrylic pigment surface. This blazon of damage is well illustrated in the JP article Rolling acrylic paintings for shipping or storage.
Materials Needed
- Paper-thin
- Cutter
- Cutting mat
- Ruler
- Staple gun/ Velcro/screws and screw driver
- Pen
- Packing Record
Corner Protection
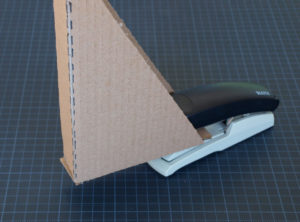
Start with a rectangular sheet of corrugated paper-thin. If the cardboard is approximately double the width of its pinnacle, the corner protectors will be more evenly shaped. (The example in Paradigm ii is a niggling on the narrow side.)
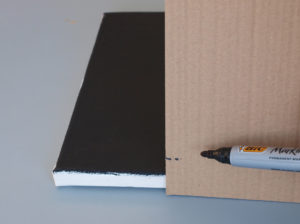
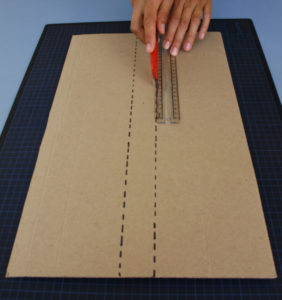
Hold the paper-thin against the edge of the painting and mark the depth of the painting plus an extra inch (two-3 cm) (Prototype one). Keep cartoon a line along the lesser edge of the cardboard at the marked distance. This will be the depth of the corner protection, which should exist large enough and then that the painting fits easily without contact with the paint layer. Observe the middle of the lath and marker the same altitude along the center of the board (Epitome 2).
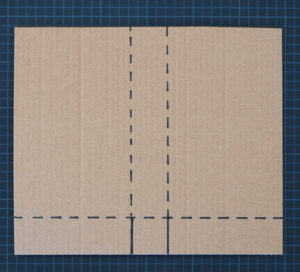
Paradigm one: Marking the depth of the corner protection: depth of painting + 1 inch/2-3 cm
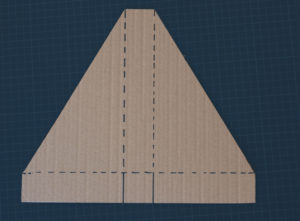
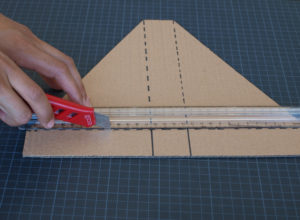
Cutting off the corners as shown in Images 3 and 4.
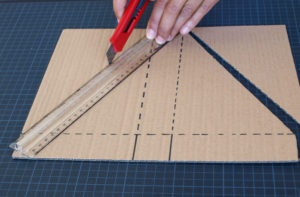
Score the marked lines without cutting through the cardboard (Image 5). Only the two curt continuous lines are to be cut (see Paradigm 4). Fold the paper-thin where scored, into a triangle and staple or tape the overlapping cardboard sides (Image 6).
Attaching the Corner Protectors
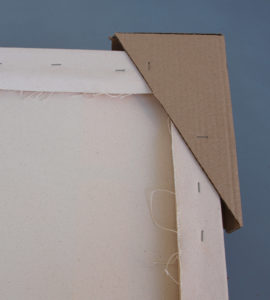
Staples, tape, screws, Velcro, or other hardware, can be used to attach the corner protectors to the contrary of the stretcher bars (Image 7). For thicker and heavier cardboard, screws, possibly with screw washers, might be necessary. Velcro would be suitable for paintings that are frequently packed and shipped. If the edges are painted, it will exist important to leave a petty space between the triangle corners and the sides of the stretcher. Otherwise, the cardboard might stick to the paint layer (Image 8).

Edge Protection with Paper-thin Rails
Once the corner pieces are attached, cardboard rail or collars can be used to protect the edges as an optional footstep. This might exist needed for larger paintings. Use a cardboard slice that is as long as the sides of the painting. In the middle, two lines are scored at a distance as wide as the depth of the corner protectors (Image 9). The edge protection is folded around corner pieces and taped (Prototype 10).
Outer Packaging
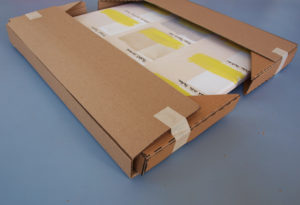
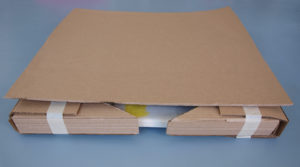
Paper-thin, foam core sheets or similar lightweight panels can be used equally covers on top of the corner protection (Paradigm 11). If the painting has no backing lath (come across Backing Boards for Canvass Paintings), so some other cardboard canvas can be placed underneath the painting. Now the painting can be wrapped in bubble wrap, polyethylene plastic sheets, or paper, depending on how it is being transported.
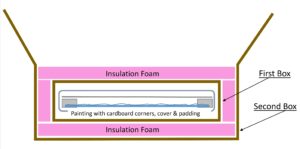
Paintings that are shipped past post require outer packaging with proper padding, so that in that location will exist less of a risk of harm from the friction due to rapid movement and handling. Double boxing, i.e. a box in a box, provides extra protection to artwork in transit, in item, accidental drops, forklift accidents or but the weight of other objects (Image 12). Mirror boxes, U-Haul or FedEx Boxes, corners from the packaging of frames or other packaging material can be recycled. Oz Clips can be used to attach a painting to a sturdier outer box and more materials from the hardware shop, such as insulation foam lath, can exist used for padding and packaging.
Finally, notes with instructions for unpacking, repacking, acclimatization periods, or other requests should be placed on the outer packaging for the recipient. Again, we would like to point out that this method of packaging might not be suitable for all paintings or situations. It offers temporary protection for transport with cheap and easily available materials. Paintings should not be stored in these packing materials.
In Safe Handling and Transportation of Acrylic Paintings a variety of packaging options are covered, from rigid cases or crates to soft packaging and packaging framed paintings. The video How To Pack Paintings For Shipping shows a like approach to the 1 hither discussed, but it is only suitable for small paintings, while this method tin can be used for medium sized and larger paintings.
stricklandtakinte.blogspot.com
Source: https://justpaint.org/pack-and-ship-unframed-paintings-with-cardboard-corners-and-rails/
0 Response to "How to Make Protective Corners to Ship Framed Art"
Postar um comentário